

Tuesday, April 25, 2017
What is the best adhesive or glue for jewelry making?
So, what truly is the best glue for jewelry and beading? With out a doubt, my opinion is E6000. It's amazing for a variety of uses like glue on bails, cabochons, and more. I love it most because it's not only good for jewelry bonding, but so much more. E6000 is a staple in my house.Why? It's waterproof, and can used on wood, metal, glass, fiberglass, ceramics, leather, rubber, vinyl, and most plastics. One of the best parts is that it dries clear, is easy to use, is paintable AND can be run thru the washer/dryer. The only downside to this miracle glue is the smell; however, you can use it outdoors or crack open a window.

Tuesday, April 18, 2017
Bead and Cord Sizing Chart in Millimeters (MM) a Free PDF Printable
Bead and jewelry supply sizing can be confusing, especially in the beginning. Jewelry supply size is always referenced by millimeters. I created this simple, printable bead and cord sizing chart. I didn't make it fancy, and make it black and white so as not to tax your printer too much, and it's about the size of a business card. Hope this helps!


click the image below to be taken to the PDF download (no worries, you don't have to sign up for anything - I promise!)
****if your printer settings default to 'fit to page', make sure to uncheck this before printing****
Thank you for visiting. Don't forget to follow my blog, and check out my shop for unique, affordable jewelry and beading supplies.
Tuesday, April 4, 2017
DIY Gift Idea Even Kid's Can Make for Mother's Day!
You or your kids can make this beautiful charm bracelet for mom and grandma this mother's day. Every mom and grandma loves any gift from their children, however this DIY charm bracelet jewelry kit is so gorgeous it's a handmade gift that's stylish, too.


This is just a quick post to give you a little DIY stacking bracelet inspiration. No need to give instructions. Simply gather up some beading supplies that you already own (or you can purchase the kit here as shown below in my shop) and string them into a love charm bracelet. The mixed metals of gold and silver in this bracelet insures it will coordinate with all her jewelry.

When you're finished with the bracelet, you can create an adorable handmade jewelry bag to gift it in. It's even no sew!! Click the pic below for instructions.
Friday, March 31, 2017
DIY No Sew Jewelry Bag Tutorial, Quick and Easy!
Need ideas for packaging your jewelry that you're selling or giving as gift? This DIY no sew pouch is not only adorable, but super easy and very affordable. If you own a jewelry business, you could have a stamp made of your logo to really personalize and add a professional touch.
Let's get started making this DIY jewelry bag.


Lay cloth out (glued seam side up), and lay your ribbon across as shown. Put a thin bead of glue along the cut edge, and fold over as shown (be sure to not glue down the ribbon!). Glue all the way across.
Step 4:


Let's get started making this DIY jewelry bag.

Here's what you need:

Hot glue gun
Ribbon
Flour sack towels (sold at Walmart, Target, etc)
Stamp and Ink
Ruler
Pinking shears (or regular scissors if you don't have pinking shears)
Step 1:

Fold the towel in half, and cut on three sides (top and sides). I made mine larger so that a business card could be added, and cut 6" x 5" (remember, this is doubled, so once unfolded it will be 12" x 5").
Step 2:


Unfold the cloth, and apply a small, thin bead of hot glue along the long (12") edge, and fold over.
Do this until the entire edge is glued down, then repeat on the second side.
Step 3:


Lay cloth out (glued seam side up), and lay your ribbon across as shown. Put a thin bead of glue along the cut edge, and fold over as shown (be sure to not glue down the ribbon!). Glue all the way across.
Step 4:


Repeat on the other side.
Step 5:


Starting at the middle point, add a thin bead of glue along the edge all the way up to the top, then fold together (it's starting to look like a pouch!).

Now glue the other side.
Step 6:

Should look like this! You're almost finished!
Step 7 (optional, but highly recommended!):

Before stamping, make sure to put cardboard or paper in the bag otherwise the ink will bleed thru.
Step 8:


Get A LOT of ink on your stamp, and then press down with force onto the bag.

DONE!!!!!!!!
\
Wednesday, November 2, 2016
Need a quick and cute gift? Why not make some cute seed bead friendship stacking bracelets? You can whip these little beauties out in no time flat. Below are instructions on how to make seed bead stacking bracelets.


Step 1: round up your materials

Grab our stacking bracelet seed bead kit here! OR search for what you already have
Decorative headpin (1)
Crimp bead covers (2) OPTIONAL
Crimp beads (2)
Chain extender (or you can link jump rings together)
Jump rings
A combination pliers tool (or crimp bead tool, flat nose pliers, round nose pliers, and nipper)
Wire

Step 2:
Snip your wire (the average wrist size is 7", and you'll want to allow an extra couple of inches for stringing), next add on your first crimp bead, then your clasp, then feed the wire back thru the crimp bead - and crimp your crimp bead!

Step 3:
Start stringing your beads - this is the fun part!

Step 4:
After you've finished stringing - add a crimp bead, next your chain extender, then loop the wire back thru the crimp and a few of the beads.

Step 5:
Add on your charm, and cover the crimp beads with crimp bead covers.

Step 6:
Add a bead onto a decorative headpin.
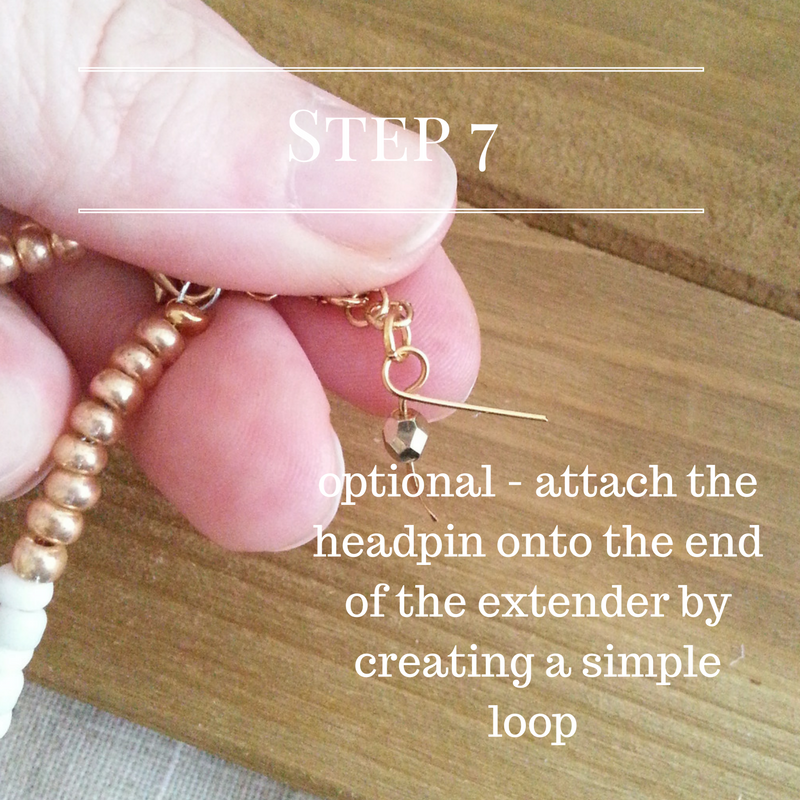
Step 7:
Attach the headpin onto the end of the extender by creating a simple loop.

Step 8:
Done! Now wear, and make more!
Tuesday, July 26, 2016
Essential oil jewelry is so popular right now. This bronze essential oil locket necklace is a must for essential oil lovers. A great way to keep your oils close without applying to the skin. This cute DIY essential oil locket necklace is easy and fun to make. These necklaces are great for wearing, selling, and gift giving!

Let's get started.

What You Need:
Flat Nose Pliers
Wire

Step 1: snip one link of the chain in the very center (on the end opposite of the closure)

Step 2: set chain aside, grab beads and wire, and create two separate three bead rosary style (simple loop) strands

Step 3: connect the bead strands to the chain

Step 4: set necklace aside, grab some wire and create a figure 8 shape (make one side smaller than the other)

Step 5: pickup the necklace and connect the strands together with the wire figure 8

Step 6: add your locket, tassel, and charm

DONE! Yay :) Now, go add some essential oil and wear it!
Monday, July 25, 2016
Tassel bracelets, tassel necklaces, really any tassel jewelry is so popular right now! Here is a quick, easy tutorial on how to make your own DIY tassel for your next creation.


Gather up what you need (which isn't much!):

Embroidery Floss
Jump Ring (a larger one)
Scissors
Flat Nose Pliers

Step 1: Open jump ring with flat nose pliers, and put thru the loop of the embroidery floss

Step 2: Close jump ring, then cut the floss to the desired length

Step 3: Pull out and use one of the threads, and tie around the tassel near the top

Done! So easy :) Now add it to your favorite jewelry creation.

If you'd like to add your tassel to a bracelet like the one above, I used the following materials:
Handmade Tassel
Silver Hamsa Charm (for good luck)
Stretch Cord (I used 3mm, but you may use whatever size fits your needs and beads!)
How will you use the tassel you just made?
Subscribe to:
Posts (Atom)